Author Archives: Sudar

About Sudar

I am WordPress plugin developer and the original developer of Bulk Delete and Bulk Move WordPress plugins.

Using USB Host Shield with Arduino

USB Host Shield

There is a huge variety of shields that are available which can be stacked on top of an Arduino. Often there are more than one manufacturer for a single type of shield itself. In a way this is good, because as a user you are going to have multiple options. But it becomes a problem when the shield is pretty complex (like the USB Host Shield) and you have to use a library and the shields are not compatible with each other. One such shield which has many incompatible versions is USB Host Shield and in this post I am going to tell you how you can select the proper shield and also the changes that you have to do to make even the incompatible shields work with the library.

What is an USB Host Shield?

Before we start, let’s first understand what is an USB Host Shield. It is a shield which provides USB Host support for Arduino.

So, what is USB Host support? The USB protocol defines two types of devices. One is called the host (or server) and the other one is called peripheral (client). The Host device controls the peripheral device and also provides power to it. When you connect any USB device like a mouse or a keyboard to your computer, your computer acts as the host and controls (or polls) the client device (keyboard or mouse or even an Arduino). For a successful communication to happen using USB protocol, you need at least one of the device to be the host, which means that you cannot connect two keyboards together and expect them to communicate with each other.

The USB Host shield has a separate chip (usually Max3421E), which provides USB Host support. Once you have this shield, your Arduino board can act as USB Host and you can connect other USB devices like keyboard, mouse or even an Android phone and communicate with the device from Arduino itself.

What you can build using USB Host Shield

USB Host shield can be used to interface any USB device to Arduino. The following are examples which I have built using the shield.

Available Hardware Options

The following are the various versions of USB Host Shields from different manufacturers.

Available Software Libraries

The following are the two libraries that are available for USB Host Shield. Both of them are from Oleg of Circuits @ Home.

  • USB Host Library v1.0
  • USB Host Library v2.0

Out of these two, the v1.0 of the library is kind of deprecated. Use it only if you really need to or have to use some other library that depends on it, otherwise use only v2.0.

Selecting the right shield

If you have not bought the shield yet, then just go ahead and buy the shield from Circuits @ Home and use v2.0 of the library. The library works out of the box and you don’t need to modify anything.

But if you have already bought the shield from Sparkfun, especially the old (like me) then read the next section to find out the changes that you have to do to the library to make it work with the shield.

Making the Sparkfun shields work

Choose the instructions from the right section below based on your shield and library version.

Old Sparkfun shield (part no: DEV-09628) with v1.0 of the library

The old sparkfun shield has two issues. First, the GPX and RESET pins are swapped and the second it has power issues.

To solve the first issue, you have to make the following change on line number 24 of the max3421e_constants.h file in the library.

Alternatively if you are using my makefile to compile Arduino sketches (more about it in a separate blog post soon), then you can grab my fork of the library and add the SPARKFUN_9628_SHIELD define to your makefile.

To address the second issue, you have to add an external power source to the shield like a battery or wall adapter, even if you have connected the Arduino through USB cable.

Old Sparkfun shield (part no: DEV-09628) with v2.0 of the library

In v2.0 of the library the communication happens over the SPI pins and therefore you don’t have to make any change to the library. But to fix the swapped pin use you have to short the pin D7 to RESET. Take a small jumper cable and connect one end of it to D7 pin and the other end to the RESET pin (next to the 3.3V pin). This is the only change that is needed to get v2.0 of the library to work.

In addition to that you should also use an external power supply.

New Sparkfun shield (part no: DEV-09947)

The new Sparkfun shield has fixed the swapped pin issue, but it still has power issue. So to use this shield with both v1.0 and v2.0 of the library, you don’t have to make any changes to the library, but you should still connect the external power source.

Related boards

The following are some of the boards that also provide USB Host support.

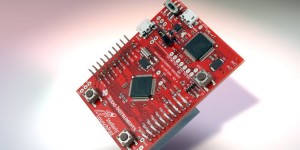
TI Stellaris LM4F120 LaunchPad available to order

LM4f120xl Stellaris Launchpad

Texas Instruments, low cost evaluation board for the ARM Cortex M4F based microcontrollers is available for ordering now. And can you guess the price? It is just $5. Yes it is just $5 😉

ARM Cortex M4F microcontroller

LM4f120xl Stellaris Launchpad The main highlight of the Stellaris LaunchPad is its microcontroller. The LaunchPad comes with the surface mount LM4F120H5QR microcontroller which has 256KB of flash memory, 32KB of SRAM, 12 ADC ports, up to 43 GPIO ports and a huge list of supported interfaces. You can see the complete list in the LM4F120H5QR chips homepage. The chip also has USB 2.0 device interface and hibernation module and also has a built-in programmer.

Ordering

TI is selling the LaunchPad at $5 (including international shipping) as a promotional price and you can order it directly from them. They say that it would take around 2-4 weeks to ship it.

I am really excited and waiting to play with it. It is definitely worth waiting for 2-4 weeks for it to ship, especially if the shipping is free and you pay only $5 to buy it 😉

User manual (update)

The user manual for Stellaris Launchpad is also now available.

URL Encoding in Arduino

In my earlier article where I showed how you can access YQL in Arduino, I mentioned that I wrote a quick and dirty function to do URLEncoding (percent encoding) in Arduino. While writing that function, I found a nice little trick about URL Encoding and thought of writing about it here.

At first, I just did a web search to see how you can do URL Encoding in C. I stumbled upon a question in stackoverflow and found that you have to use the curl_easy_escape function in libcurl. Since Arduino doesn’t have a port for libcurl (yet 😉 ) I had to write my own.

I did a web search again and came across an implementation of URLEncode in C by Umberto Salsi.

It was really simple and used a nice trick. Look at lines 11 and 12. Initially I didn’t understood it and so started reading RFC 3986. On page 11, it talks about how the encoding is done.

A percent-encoded octet is encoded as a character triplet, consisting of the percent character “%” followed by the two hexadecimal digits representing that octet’s numeric value. For example, “%20” is the percent-encoding for the binary octet “00100000” (ABNF: %x20), which in US-ASCII corresponds to the space character (SP)

After reading it things became clear and I was able understand the bit magic which Umberto Salsi was doing.

I modified the code so that it accepts the string that needs to be converted, instead of reading it from console and below is my version.

I hope the bit manipulation logic is clear. If not, let me know (by leaving a comment below) and I will write a blog post explaining it. Till then happy hacking 😉

Parsing JSON in Arduino

JSON

I guess most of you would by now, know what is JSON. It is a data format to represent structured data like XML, but is very small and has native support in JavaScript. Libraries are available in various languages for parsing JSON.

But I was stunned when I read about aJson Arduino library. The author of this library has ported JSON parsing to Arduino. JSON parsing in Arduino, opens up lot of opportunities and I immediately wanted to test it.

Parsing JSON (decode)

JSON decoding or parsing means, converting JSON string into objects or data structures so that we can retrieve all or selected information from it.

aJSON library provides the parse method which allows you to parse or decode JSON strings.

Consider a JSON structure like the following.

To parse it, all you need is just this piece of code.

In addition to parsing simple structure like above, the library is also capable of parsing complex or nested JSON structure like the following.

Building JSON (encode)

JSON encoding is the reverse process of JSON decoding. Here you create JSON strings from objects or data structures.

aJSON library provides addItemToObject method for encoding or creating JSON strings.

To build the same JSON string that we used above, you just have to do the following.

Full working example

I have created a complete sketch that parses a complex nested JSON string. This JSON string is actually a response of a YQL call. You can find this sketch at github. I am also going to contact the author of the library to see if this can be added to the examples sketches of the library.

Update: This sketch is now part of examples that ships with the aJson library.

Additional features supported by aJson

In addition to the above features aJson also supports the following advanced features.

Manipulating JSON Objects

After you create a JSON object, either by parsing a JSON string or by creating a JSON object, the library allows you to manipulate these JSON objects.

Filtering while parsing

You can pass an optional filter parameter to the parse method, which ignores the list of keys present in the filter array. This feature is very useful, if you have to parse a huge JSON object and you have less memory to spare.

Parsing streams

In addition to parsing strings, the library also has the ability to parse streams directly without storing them first. This feature is again very useful, if you are running out of space. I have not managed to get this feature to work yet. Will write about it in detail once I get this to work.

Let me know if you have done something cool with this library. Happy hacking 🙂

Accessing YQL from Arduino

Yahoo Query Language

While writing the tutorial on how to parse JSON in Arduino, I used a sample JSON response that I got from YQL. After writing the tutorial, it struck me that I can in fact make Arduino to directly query the YQL server to get the response. I immediately dusted off my Ethernet shield and tried doing it. After a couple of hours, my Arduino was querying YQL directly and got the data by parsing the JSON response 🙂

What is YQL?

First, you might ask me what is YQL. YQL stands for Yahoo Query Language. It is an expressive SQL-like language that lets you query, filter, and join data across Web services. You can read more about YQL from the Yahoo Developer network page.

YQL Query

The following lines define the YQL query that I was using for testing the code.

This query basically looks into the feed of my blog and returns the title of the latest article.

Ethernet shield

In order to make the Arduino make a web request, it first needs to connect to Internet. There is a shield called Ethernet shield that provides Ethernet capabilities to Arduino and allows it to connect to Internet directly, without using any other intermediate device.

Making the request

The Ethernet shield comes with an Arduino library, which provides lot of functionalities like DHCP, DNS etc. It has a class named EthernetClient that allows you to make web request. I was using this class to make the request to YQL.

The following are the relevant part of the code that uses the Ethernet library to query the YQL servers.

Encoding the URL

To make YQL request, you need to urlencode the url. Arduino, didn’t had a built-in way of doing it. I quickly wrote a hacky way to do it. You can find it in the URLEncode method. Update: I talk about the [logic behind the URLEncode function](http://hardwarefun.com/tutorials/url-encoding-in-arduino) in a separate blog post.

Getting the JSON string from response

I needed to get the JSON part from the response. I just searched for all content between the first ‘{‘ and the ‘}’ character. The core part of this logic is present in the following lines.

Parsing the JSON response

I used the aJson library to parse the JSON. You can also checkout my article about JSON parsing in Arduino. The actual parsing logic is present in the parseJson function.

Keeping track of free memory

Since JSON parsing is memory intensive and Arduino has very limited memory, we always need to keep an eye on the amount of free memory that is available. I used the MemoryFree Arduino library for it.

This is an interesting library as well. Will be writing a separate detailed article about it as well.

Download source code

You can download the complete source code of the sketch that I used from github. Let me know if you put this into some good use 🙂

It is amazing that how much you can squeeze into a small Arduino. I am going to try to see if I can add a LCD display to this. Will post about it if I succeed.

Happy hacking 🙂

Getting started with Arduino and AVR

Arduino

In the previous tutorial, I talked about how to get started with hardware programming and also gave links to brush up your electronic skills.

In this article, I will talk about the tutorials/sites I used while learning Arduino (my favorite board and the main reason why I got interested into hardware programming) and then towards the end will also the sites that I used for learning to program AVR directly without using Arduino.

Arduino Tutorials

Official Arduino site

The first tutorial to checkout is the official Arduino getting started guide. It is very comprehensive and explains all the functions and libraries in Arduino. It is also the most up to date tutorial. While you are at it, also checkout the official forum, where you can post questions and get answers about Arduino.

Tronixstuff Arduino tutorials

The next tutorial to checkout is the Arduino series written by John John Boxall at Tronixstuff. Till date he has more than 47 chapters all dedicated to Arduino and I am pretty sure he will add more. His tutorials are both in depth and each to follow for beginners.

AVR Tutorials

Once you have gotten your hands dirty with Arduino, you might want to try out AVR directly. You can refer to the following sites/tutorials to get started with AVR programming

AVR tutorial by LadyAda

LadyAda, the person behind AdaFruits has a set of very good introductory tutorials on AVR. These are very basic tutorials and helps you to setup AVR toolchain on your machine and burn your programs using AVRDude.

AVR tutorial by Hackaday

Hackaday has as tutorial series on AVR programming. This tutorial concept behind AVR programming and will help you write you first program with AVR.

AVR Freaks

Though strictly not a tutorial, AVR Freaks is a very good resource for anything related to AVR. You can also checkout some of the tutorials written by the forum members. Most of these are advanced stuff and it would be really helpful for you once you have mastered the basics.

Hope these resources are helpful to you as they were for me. Also if you know of a good tutorial or site that has helped you a lot, then do leave a comment below and I will add them to the list.

Happy hacking 😉

Getting started with hardware programming

Ohms Law

People who are not from electronics background generally find it hard sometimes to get started with hardware programming, since it requires some basic understanding of electronic concepts. A basic understanding of different electronic components like resistors, capacitors, batteries etc., together with some fundamental concepts like voltage, current, Ohm’s law etc., will drastically help you to reduce the learning curve that is needed for programming in hardware.

The following are some of the tutorials/sites from which I learned the basics of hardware. I am sharing it here, so that it is useful for anyone who wants to get their hands dirty with hardware programming.

Basic Electronic concepts

Ohm’s Law

The first concept to learn in electronics is Ohm’s Law. Wikipedia’s entry about Ohm’s law is pretty good to understand the basics.

All about circuits

Once you have read the basics of Ohm’s law, head over to this excellent site called All About Circuits. This site has an online book which covers all basic concepts behind electronics. You can skip some sections on AC (since most of the micro controllers deal with DC), but can read it if you have time to get the full picture.

Sparkfun “Beginning Embedded Electronics” tutorials

Another excellent resource is the set of “Beginning Embedded Electronics” by SparkFun. They cover lot of practical details about Power supply, Voltage regulation, discussion about different micro controllers etc.

Different pin states

One other excellent source that helped me is this small writeup by Dangerous Prototypes, which explains the difference between the different states of a micro controller pin.

Hope these resources help you get more familiar with hardware programming. Also if you know of a good tutorial or site that has helped you a lot, then do leave a comment below and I will add them to the list.

Over the next few weeks, I will be writing up getting started guides for specific areas like AVR and Arduino. Stay tuned 🙂 Update: The getting started guide for Arduino and AVR is up.

Happy hacking 😉

Hello world!

Hello everyone, welcome to HardwareFun, a place where fun meets hardware 🙂

I was a software programmer all throughout my life, who recently got introduced to the world of electronics and hardware programming. After playing around with it for sometime I realized that is a very satisfying hobby. It is really a great feeling to see small objects move around based on your command.

I created this website to document my different adventures with hardware and also help other people who wants to experience the same feeling like mine. So, the official aim of this website is to bring out the fun part of hardware programming and electronics 😉

Over the next few days, you will find more tutorials on basic electronics, micro controllers like AVR, open source hardware like Arduino etc and also my journey in trying out various hardware boards and components. Till then you can checkout some of the projects that are available.

So, sit back, fasten your seat belts and enjoy the fun of hardware programming. Happy hacking 😉