Monthly Archives: March 2013

A guide to choosing the correct display cable for Raspberry Pi

Composite cables

When I wrote about choosing the correct accessory for Raspberry Pi, I mentioned that choosing the display cable could get a little tricky. There are a lot of things to keep in mind and so I thought of writing a separate guide for choosing the correct display cable.

The following are the different scenario’s which you might encounter.

You have a HDMI capable display device

If you have bought your TV or monitor in the last year or two, chances are high that you already have a HDMI capable display device. If you have a HDMI capable device then all you need is a HDMI to HDMI cable and you should be good to go.

If you look closer you might already have a HDMI cable, which would have come with your device. If not you could buy one for around Rs. 500 in SP Road.

You have a composite video capable display device

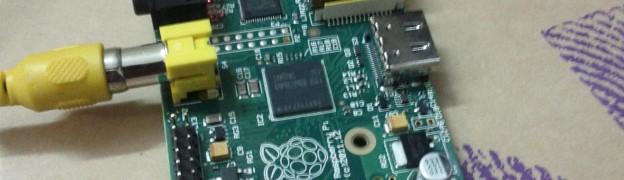
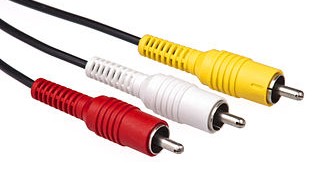
If you have a composite video capable device like a TV, then you can use a composite cable to connect Raspberry Pi with the device. The composite cable, also known as RCA connector consists of three plugs, one yellow, one white and one red (refer to the image below)

Composite cables

You have to connect the yellow lead (video) between Raspberry Pi and your device.

There are two small issues with RCA cables.

  • The resolution supported by Raspberry Pi through the composite cable connector is small.
  • You have to use a separate audio to composite cable converter to get audio.

You have a DVI-D capable device

If you have a device that has a DVI-D connector then you can buy a simple HDMI to DVI cable and use that to connect Raspberry Pi to your TV or monitor.

This works exactly like HDMI output and you should have any issues. You can get this cable for around Rs. 750 in SP Road.

DVI-D vs DVI-A vs DVI-I

Once thing to note is that you must make sure that you have a DVI-D (digital) slot and not a DVI-A (analog) or a DVI-I slot. Compare your connector using the following diagram to figure out which one you have.

DVI-connector-types

DVI-D works by sending digital signals while DVI-A and DVI-I works by sending analog signals. They are not compatible with each other and Raspberry Pi supports only devices that have DVI-D slots.

You have only a VGA capable device

If you have a device that supports only VGA (like an old monitor or projectors), then things get little tricky, since Raspberry Pi doesn’t have support for VGA devices out of the box.

You might come across VGA to HDMI cables but these are used to convert VGA signals into HDMI signals and not the other way around.

There are a couple of HDMI to VGA converters available, but they are generally quite expensive and are not available in SP Road. The following are some adapters that are known to work.

  • Adafruit (expensive, but supports audio as well)
  • Amazon (supports only video, audio is not available through Pi’s audio jacket)

I bought the second one from Amazon and it looks like this.

hdmi-to-vga-adapter

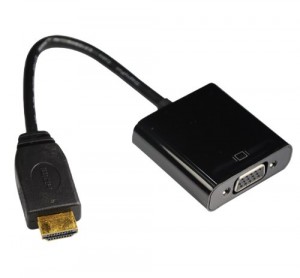
It works with my very old VGA monitor, but the problem is that you don’t have audio support. Since HDMI output is enabled in Raspberry Pi, it shuts off the audio jacket.

Update: I found a way to enable audio output even when hdmi is enabled

Just use SSH

The last option is to just use SSH and connect to Raspberry Pi from a terminal. This of course needs your Pi to be connected to a network.

You can also install a VNC server in Raspberry Pi and use any VNC client to connect to it.

I was using this approach till I bought the HDMI to VGA converter.

I hope this guide helps you to choose a correct cable and display device for Raspberry Pi. If you have any more suggestion, feel free to leave a comment below.

Happy Pi’ing 😉

A guide to choosing correct accessories for Raspberry Pi

raspberry pi up and running

Ever since I bought my Raspberry Pi, people reached out to me asking what are the accessories that I am using with it. It took me a bit of research to find out the best accessories needed for Raspberry Pi and I thought of documenting it so that it is useful for others as well.

Wherever possible, I will also include options to source them locally from SP road in Bangalore. Meanwhile, if you have any suggestion then do leave a comment below and I will update the post.

Power supply adapter

The first and foremost important accessory for Raspberry Pi is the power adapter. You need to be little careful while choosing this, because if you don’t give enough power to Raspberry Pi, then you will get random freezes and if you give too much power, you might burn your pi, which I guess you don’t want to do 😉

You need an adapter that can give 5V and around 1.0A (1000 mA) to 2A (2000 mA). It should be on the higher side, if you are connecting lot of USB devices.

Before you decide to buy a power adapter, do a quick look around. Chances are high for you to find one lying around in your home. Most mobile phone chargers work at 5V and can give around 1.0 A current.

I found that following to be working for me.

  • iPad charger (not iPhone charger)
  • HTC Hero mobile charger
  • Samsung Nexus phone charger
  • Kindle charger

If you are in Bangalore, then you can buy a good 5V 2A power adapter for around Rs. 300 in SP road.

Display cable

After the power supply, the next tricky one is choosing the proper display device and cable for your Raspberry Pi.

If you have a HDMI capable display device

If you have a HDMI capable TV or a monitor, then it is slightly easy for you. All you need to buy is the HDMI to HDMI cable and you are all set.

You most probably will have a cable that came with your TV or monitor. If you don’t have one lying around, you can buy it in SP road for around Rs. 500.

If you don’t have a HDMI capable display device

Things get little tricky if you don’t have a HDMI capable TV or monitor. I will write another article explaining the full list of options, meanwhile you can use the following guideline. Update: I have written a separate guide for choosing the correct display cable for Raspberry Pi.

If you have a TV or monitor that supports DVI-D (not DVI-A) then you can buy a HDMI to DVI cable. It costs around Rs. 750 in SP road.

If your device supports composite video-audio, like most old TV’s then you can use a composite video cable (yellow) to connect Raspberry Pi to your TV. But keep in mind that most of the time the quality of video and resolution is not that good.

If you have only a VGA supported device, like old monitors or projectors then you have to buy a HDMI to VGA converter (not cable). They are generally expensive and you don’t get them in SP road. Two options that I found to be working are the following.

The other option is to just use ssh and screen to communicate to your pi from a terminal. I was doing it till I bought the cable myself.

SD Card

The next accessory that you need to buy is a SD card. You need at least 2GB card to fit the default OS image. I would suggest you to get either a 4 GB or 8 GB one, because if you start to do anything important you need more space and storage these days are cheap. So an extra couple of hundred rupees is worth it.

One important thing to note is that you should buy one which is at least of class 4. A class of a SD card denotes the speed at which it can write and Raspberry Pi has issues if the class of the SD card is less than 4.

I bought a 16 GB class 4 Sandisk card for Rs. 750 in SP road. 8 GB ones cost around Rs. 500.

Sites like Adafruit sell preloaded cards and are generally a little costly. I wouldn’t recommend them, unless you are an absolute beginner and don’t want to load the OS into the card yourself.

SD Card reader (optional)

If you choose not to buy a preloaded card, then you need a card reader to connect your SD card to your computer. Most modern laptops and mac have a built-in card reader. If you don’t have one, then you might have to add that also to your list.

Wifi Dongle

If you have model A pi or if you don’t want to connect an ethernet cable in your model B pi, then you can buy a WiFI dongle. I bought mine from element 14 and it was working out of the box.

You can also buy one from SP road for around Rs. 900. There are cheaper ones available, but I am not sure whether they will work with Raspberry Pi.

Keyboard and mouse

You can connect any USB keyboard or mouse and it will work. But if you only have a PS2 keyboard or mouse, then you can buy a USB to PS2 converter for around Rs. 300 in SP road.

I would also recommend a wireless keyboard and mouse if you are going to be far away from your pi or use XMBC to make your pi as a media center.

USB thumb drive (optional)

Even though you can’t boot only from a USB thumb drive, I found that just having the boot partition in a SD card and the remaining file system in a USB thumb drive gives me slightly better performance. I Will write an article explaining the process soon.

So if you are planning to do this as well, then you might consider buying a 4 or 8 GB high speed pen drivers.

USB Hub

Since model B has only two USB slot (and model A has only one), you will be running out of USB slots pretty soon. To connect more devices you need to buy a USB Hub.

Also if the USB devices that you using requires a significant amount of power, then you might have to buy a powered USB hub.

The normal USB hub costs around Rs. 100 and the powered one around Rs 450 in SP road.

Case

I keep my pi on most of the time and found it prone to become dusty. I bought a case to protect it and would recommend it as well.

You can buy a fancy one for around $20 or buy a minimalistic one which is just functional. I bought mine for around $8 in Sparkfun.

Recently, I discovered that it is also available in SP road for around Rs. 300.

One thing to keep in mind while choosing the case is that, make sure it has an opening for the GPIO pins. I found that most fancy ones don’t have the opening and it becomes difficult to interface the pi with external devices.

I hope that this guide helps you to choose the correct accessory for your Pi. If you have any suggestion then leave a comment below and I will add it to the list.

Happy pi’ing 😉