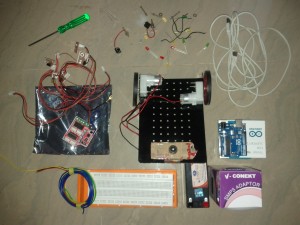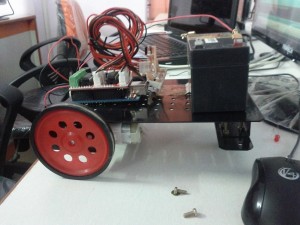
I am starting a new series of articles explaining how you can create robots using Arduino. These are the same robots, that I used in my various talks.
I am planning to post the article every Friday, so that you will have enough time to try it out over the weekend.
Assumptions
I am going to assume, that you have basic knowledge of Arduino and electronics. If you can make LED’s blink, then you are ready 😉
If not, you can use the following tutorials to get started. These were the same resources that I used when I started playing around with Arduino.
Soldering skill is not mandatory, but would be a plus. If you struggle with soldering (I still do 🙂 ), then refer to the comics soldering book by Mighty Ohm.
Parts needed
- Any Arduino (Uno, Leanardo, Mega or one of the many clones) and the USB cable

- 2 DC Motors (preferably 6V)
- 12V Led acid battery and charger
- Breadboard
- Bot Chasis frame
- 2 (or 4) Wheels
- Front support wheel
- Screws, Bolts & Screw driver
- LED, Light sensors, resistors, jumper wires etc
- L293D IC (preferably in a breakout board). You can also use a Motor shield if you have one
Agenda
The following is the rough agenda, that I am planning for this series. Based on the feedback, I might slightly tweaked it a bit.
- Introduction & parts needed
- Introduction to DC motors
- Using L293D and controlling DC Motor speed
- Assembling the bot
- Putting everything together
We will have a basic working bot by this time. It will look roughly like below.
After that I will teach you how to do cool stuff with the bot. Right now I am planning to do the following.
- Teach it bot to avoid obstacles using IR
- Find how far it is from obstacles using Ultra sound
- Control the bot using your Android device
- Control the bot from a browser
In addition if you want me to write a tutorial on a specific feature, then do let me know by leaving a comment below and I will try my best 🙂
Happy Roboting 😉

Pingback: Building Robots using Arduino – DC MotorsHardware Fun | Hardware Fun
Pingback: Creating Robots using Arduino – H-bridgeHardware Fun | Hardware Fun
Pingback: Controlling speed of DC Motors using ArduinoHardware Fun | Hardware Fun
Pingback: Nice Build A Robot photos | Build a Robot
If you are still doing this I could use some help I bought a frame and motors together and the motors have encoders on them I would like to know how to properly hook them up and be able to accurately track , by pulses, the robots distance and speed using the encoders, then join in with the rest of the plans you are working with, Im hoping for help, If you wouldn’t care to give me a push it would be great.
Are you using plain DC motors or stepper motors?
yes I bought 2 to play with for what started to be a science project for my daughter but I have become totally engrossed in it. but yes two DC motors with encoder wheels mounted on the wheel shaft and only two lugs + and – I am guessing the board is reading the magnetic pulses through the wheel and measuring pulses ? I don’t know if Im missing something and not sure the best way to use them. in the end I would like to be able to make the robot go a distance through encoder pulses then turn and continue a set path using them along with avoidance control and possibly gps to navigate. I love your project and was thankful to see your reply its perfect thank you.
I have not personally used encoder wheels. But controlling plain DC motors is very easy. Did you checked the other posts in this series?
Also, all the best for your bot 😉
I am a beginner to arduino ! I have learnt basic things, sir i want to learn basics of using bluetooth module with arduino , i just want to know how to join bluetooth module to arduino and how to use it with codes that are meant for it with any specific library etc. designed for it
search youTube tutorials or Google images on:
1- HC05 – bluetooth module,
2- L293D – motor controller,
3- APP inventor 2 – an Android APP maker that will send data to Arduino via BlueTooth.
Good luck 🙂
Most bluetooth modules work through serial. Just connect the Bluetooth module to the Tx and Rx pins and use the serial library.
Yo, when i put ur code, on of the wheels goes write, however, the other ones goes back. How i cas solve that.