Monthly Archives: May 2013

Building Robots using Arduino – DC Motors

This is part 2 of my “Building Robots using Arduino” tutorial series, explaining how you can create robots using Arduino.

In this article, I will introduce DC motors and how to use them.

Types of Motors

If you look at the Wikipedia page of DC motors, you will realize that there are different types of DC motors. In this tutorial, I am going to be concentrate only on DC Brushed motors.

Parameters for choosing DC Motors

There are three different parameters that you have to keep in mind while choosing a DC motor for your project. They are

  • Voltage
  • RPM
  • Torque

Voltage

This parameter specifies the voltage level at which the motor will run. Most hobby motors work in the voltage range of 5-12 V. You should make sure that you don’t run the motor outside its range.

RPM

The next parameter to keep in mind is RPM (Rotations Per Minute). This basically specifies the number of rotations that will be made by the motor when the specified voltage is applied across its terminals. The higher the RPM, the faster the motor will run. Typical rpm’s for a hobby motor ranges from 200-2000 rpm.

Torque

The torque of a DC motor, specifies the force at which the motor will run. If the torque of a motor is high, then it can pull more load. You should choose the torque of the motor, based on the load/weight it has to pull.

Connecting a DC Motor

The DC motor will have two terminals.

If you connect the positive terminal of a battery/voltage source at one end and the Gnd at the other end, then the motor will rotate in one direction. If you reverse the connection, then the motor will run in the opposite direction.

Testing a DC Motor

We can do the following small experiment to better understand the connections of a DC motor.

Take a DC motor and a battery which has the voltage equal to the voltage rating of the DC motor. If no wires are soldered in the DC Motor, then take two pieces of wires and solder them at the two terminals.

Connect the positive terminal of the battery, to one terminal and the Gnd terminal of the battery to the other. You should see the motor rotating. Make a note of the direction of rotation.

Next reverse the terminals. The motor should rotate again. Make a note of the direction of rotation. If you have connected it properly, then you will notice that the direction of rotation has changed.

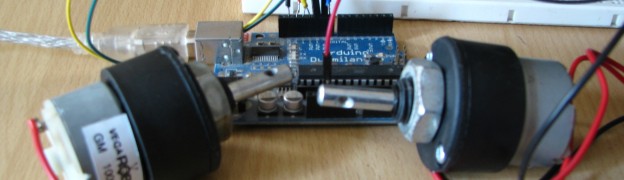
Connecting the motor to Arduino

Now let’s try to do the same thing using Arduino. To do that we have to simulate the positive and Gnd connections of a battery in Arduino.

Note: Don’t use a high voltage motor for this. This might spoil the Arduino board.

If you set a pin to output mode, and then put it in high state, then it is equal to the positive terminal of a battery, since it will be at +5V. Similarly, if you set a pin to output mode, and then put it in low state, then it is equal to the Gnd terminal of a battery.

Let’s write a small Arduino sketch to test the motor.

In the above program, I set two pins (12 and 13) to be in output mode. After that, for the first 5 seconds I set pin 13 to be high and pin 12 to be low. So pin 13 will act as +ve terminal and pin 12 will act as ground. The motor will rotate in one direction. For the next 5 seconds, I set pin 13 to be low and pin 12 to be high. When I do that, the terminals are interchanged and the motor will rotate in the other direction.

You can see this in action in the following YouTube video.

This sketch is very similar to the led blink sketch. Remember what I said last week – if you can blink a led, you can build a robot as well 😉

What’s next

As you might have already figured out, this method is not very efficient. Also you can’t supply full voltage to the motors. We will correct all that next week.

In the next post of the series, we will use an IC called L293D which will make our life a lot easier 🙂 We will also see how we can change the speed of the motor, in addition to the direction.

See you all next week then. Till then happy roboting 🙂

Building Robots using Arduino

I am starting a new series of articles explaining how you can create robots using Arduino. These are the same robots, that I used in my various talks.

I am planning to post the article every Friday, so that you will have enough time to try it out over the weekend.

Assumptions

I am going to assume, that you have basic knowledge of Arduino and electronics. If you can make LED’s blink, then you are ready 😉

If not, you can use the following tutorials to get started. These were the same resources that I used when I started playing around with Arduino.

Soldering skill is not mandatory, but would be a plus. If you struggle with soldering (I still do 🙂 ), then refer to the comics soldering book by Mighty Ohm.

Parts needed

  • Any Arduino (Uno, Leanardo, Mega or one of the many clones) and the USB cablearduino-robotics-kit
  • 2 DC Motors (preferably 6V)
  • 12V Led acid battery and charger
  • Breadboard
  • Bot Chasis frame
  • 2 (or 4) Wheels
  • Front support wheel
  • Screws, Bolts & Screw driver
  • LED, Light sensors, resistors, jumper wires etc
  • L293D IC (preferably in a breakout board). You can also use a Motor shield if you have one

Agenda

The following is the rough agenda, that I am planning for this series. Based on the feedback, I might slightly tweaked it a bit.

  • Introduction & parts needed
  • Introduction to DC motors
  • Using L293D and controlling DC Motor speed
  • Assembling the bot
  • Putting everything together

We will have a basic working bot by this time. It will look roughly like below.

arduino-robotics

After that I will teach you how to do cool stuff with the bot. Right now I am planning to do the following.

  • Teach it bot to avoid obstacles using IR
  • Find how far it is from obstacles using Ultra sound
  • Control the bot using your Android device
  • Control the bot from a browser

In addition if you want me to write a tutorial on a specific feature, then do let me know by leaving a comment below and I will try my best 🙂

Happy Roboting 😉

Arduino Yún – Arduino based wireless Linux board

I was following news about Maker Faire in Twitter today and was quite surprised when I came to know that Massimo Banzi co-founder of Arduino, announced Arduino Yún, a new product that combines Arduino and Linux.

Specification

I was quite excited and quickly checked the specs. It is a combination of Arduino Leonardo (based on the Atmega32U4 processor) with Atheros AR9331 a Wifi system-on-a-chip running Linino (a MIPS GNU/Linux-based on OpenWRT).

On the microcontroller level, it has 14 digital input/output pins (of which 7 can be used as PWM outputs and 12 as analog inputs), a 16 MHz crystal oscillator and a micro USB connector like Leonardo.

But in addition to that, it has a standard A type USB connector, a micro-SD card plug and is Wi-Fi enabled. I am not sure if the USB connector can be used in host mode. If yes, then it will be awesome.

Programming

One of the exiting features for me personally is that you can program this board using Wi-Fi. Also they provide a Bridge library that allows you to link the 32u4 microcontroller with Linux.

It seems that you can also SSH into the board and install custom Linux packages.

Cost

The cost of the board is $69 and will be available at the end of June.

How it compares with Raspberry Pi

Now the real question is how does it compare with Raspberry Pi. This seems to be the first question in the comments section of Arduino blog as well 🙂

Okay, Raspberry Pi wins clearly from the cost perspective. $35 vs $69 🙂

But I think the real benefit would be from the ease of programming perspective. Even though Raspberry Pi provides a full stack, setting up everything and then programming it could be quite involved. From the looks of it the board with the Bridge library seems to be mostly plug-and-play.

Also it seems Arduino has partnered with a startup called Temboo to provide normalized access to 100+ APIs from a single point of contact.

It would be really interesting to see how this product matures. Also Arduino is hinting that this is the first in a family of products.

So will I buy one even though I own a bunch of Raspberry Pi’s? YES, definitely 🙂

Update: Arduino is starting to write a couple of blog posts about the board. Make sure you don’t miss it. Also it will be available for purchase from September 10.

Update: Here is the video of Massimo Banzi showing off Arduino Yún